도입 배경 Github Oauth를 통해 인증인가를 구현하던 과정에서 깃허브에서 발급된 코드를 통해 Github API에 Github Access Token을 발급 요청을 보내야했다. 그리고 발급된 Github Access Token을 통해 해당 사용자의 정보를 요청해야 했다.
선택 가능한 방법들 서버에서 HTTP 요청을 보낼 수 있는 방법은 여러가지가 있다.
HTTPClient
RestTemplate
WebClient
간단하게 세가지 방법을 비교하자면 다음과 같다.
HttpClient
RestTemplate
WebClient
논블락킹 방식 제공 여부
제공
X (블락킹 방식)
제공
비동기 방식 제공 여부
제공
X (동기 방식)
제공
필요한 의존성
없음(Java 11에 포함)
spring-boot-starter-web에 포함
webFlux에 포함
스프링 부트를 활용해서 프로젝트를 하는 경우 RestTemplate를 사용하는 경우가 많다.
하지만 스프링 공식문서의 RestTemplate 설명을 보면 작은 버그 수정만 앞으로 진행되고 큰 개선은 진행되지 않을 것이니 WebClient를 사용할 것을 권장한다.https://docs.spring.io/spring-framework/docs/current/javadoc-api/org/springframework/web/client/RestTemplate.html )
하지만 WebClient를 사용하기 위해서는 webFlux를 의존성에 추가해줘야 한다.
webFlux는 리액티브 프로그래밍을 스프링에서 제공하기 위한 모듈이다.
현재 우리 프로젝트는 스프링 MVC 기반 블락킹 동기 기반 어플리케이션인데 WebClient를 사용하기 위해 리액티브 프로그래밍을 지원하는 모듈을 추가해주는 것은 지나치다고 생각했다.
반면 HttpClient는 Java 11에 포함되어 있기 때문에 자바 버전만 지원된다면 다른 의존성을 추가해주지 않아도 된다.
그래서 우리 프로젝트에는 HttpClient를 사용하기로 했다.
HttpClient 간단한 사용법 동기 방식으로 GET, POST 요청 보내는 예시 먼저 외부 API 역할을 하게 될 컨트롤러를 간단하게 구현해보자.
이를 위해서는 HttpCliet를 실행하는 프로젝트와 외부 API 역할을 할 스프링 부트 프로그램을 서로 다른 프로젝트로 분리해서 구현하기로 한다.
초간단 컨트롤러 1 2 3 4 5 6 7 8 9 10 11 12 13 14 @Controller @RequestMapping("/test") public class ExampleController @GetMapping("/sync") public ResponseEntity<String> syncGet () return ResponseEntity.ok("동기 GET 요청 처리 성공!" ); } @PostMapping("/sync") public ResponseEntity<String> syncPost () return ResponseEntity.ok("동기 POST 요청 처리 성공!" ); } }
이제 초간단 컨트롤러의 프로젝트를 로컬에서 구동시킨다.http://localhost:8080을 기본으로 작동한다.
HttpClient를 활용한 HttpClientExample 구현 이제 외부 API에 요청을 보내는 HttpClient를 구현해보자.
1 2 3 4 5 6 7 8 9 10 11 12 13 14 15 16 17 18 19 20 21 22 23 24 25 26 27 28 29 30 31 32 33 34 35 36 37 38 39 40 41 42 43 public class HttpClientSyncExample private final Logger logger = LoggerFactory.getLogger(HttpClientSyncExample.class); private final ObjectMapper objectMapper = new ObjectMapper(); private final HttpClient httpClient = HttpClient.newBuilder() .version(Version.HTTP_2) .followRedirects(Redirect.NORMAL) .connectTimeout(Duration.ofSeconds(10 )) .build(); public HttpResponse<String> requestSyncGetApi (final String uri) throws IOException, InterruptedException final HttpRequest request = HttpRequest.newBuilder(URI.create(uri)) .GET() .header(HttpHeaders.ACCEPT, MediaType.APPLICATION_JSON_VALUE) .build(); final HttpResponse<String> response = httpClient.send(request, BodyHandlers.ofString()); validateSuccess(response); return response; } private <T> void validateSuccess (final HttpResponse<T> response) final HttpStatus status = HttpStatus.resolve(response.statusCode()); if (status == null || status.isError()) { logger.warn("URI: {}, STATUS: {}" , response.uri(), response.statusCode()); throw new RuntimeException("요청 처리 실패" ); } logger.info("URI: {}, STATUS: {}, BODY : {}, " , response.uri(), response.statusCode(), response.body()); } public HttpResponse<String> requestSyncPostApi (final String uri, final Object requestBody) throws IOException, InterruptedException final String requestBodyString = objectMapper.writeValueAsString(requestBody); final HttpRequest request = HttpRequest.newBuilder(URI.create(uri)) .POST(BodyPublishers.ofString(requestBodyString)) .header(HttpHeaders.CONTENT_TYPE, MediaType.APPLICATION_JSON_VALUE) .header(HttpHeaders.ACCEPT, MediaType.APPLICATION_JSON_VALUE) .build(); final HttpResponse<String> response = httpClient.send(request, BodyHandlers.ofString()); validateSuccess(response); return response; } }
HttpClient 객체를 만들어 놓고, 필요할 때마다 HttpRequest를 만들어서 HttpClient 객체에 send 메서드를 통해 요청을 보낸다.
그리고 POST 요청을 보낼 때는 Body 값을 Object Mapper로 객체를 문자열로 만들어서 보내줘야 한다.
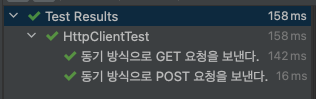
테스트 코드로 작동 확인하기 이제 테스트 메서드 몇 개를 만들어서 동작을 확인해보자.
1
2
3
4
5
6
7
8
9
10
11
12
13
14
15
16
17
18
19
20
21
22
23
24
25
26
27
28
29
30
31
32
33
34
35
36
37
class HttpClientTest private final HttpClientSyncExample httpClientSyncExample = new HttpClientSyncExample(); @Test @DisplayName("동기 방식으로 GET 요청을 보낸다.") void syncGet () throws IOException, InterruptedException final String uri = "http://localhost:8080/test/sync" ; final HttpResponse<String> response = httpClientSyncExample.requestSyncGetApi(uri); assertAll( () -> assertThat(response.statusCode()).isEqualTo(200 ), () -> assertThat(response.body()).isEqualTo("동기 GET 요청 처리 성공!" ) ); } @Test @DisplayName("동기 방식으로 POST 요청을 보낸다.") void syncPost () throws IOException, InterruptedException final String uri = "http://localhost:8080/test/sync" ; final String requestBody = "bodyValue" ; final HttpResponse<String> response = httpClientSyncExample.requestSyncPostApi(uri, requestBody); assertAll( () -> assertThat(response.statusCode()).isEqualTo(200 ), () -> assertThat(response.body()).isEqualTo("동기 POST 요청 처리 성공!" ) ); } }
테스트를 실행해보면 다음과 같이 모두 잘 작동하는 것을 볼 수 있다.
참고
https://www.baeldung.com/java-9-http-client https://golb.hplar.ch/2019/01/java-11-http-client.html https://github.com/yangdongjue5510/http-client
Java 11의 HttpClient 사용법을 배울 수 있는 레포지토리.https://github.com/yangdongjue5510/http-client )