1. GET API

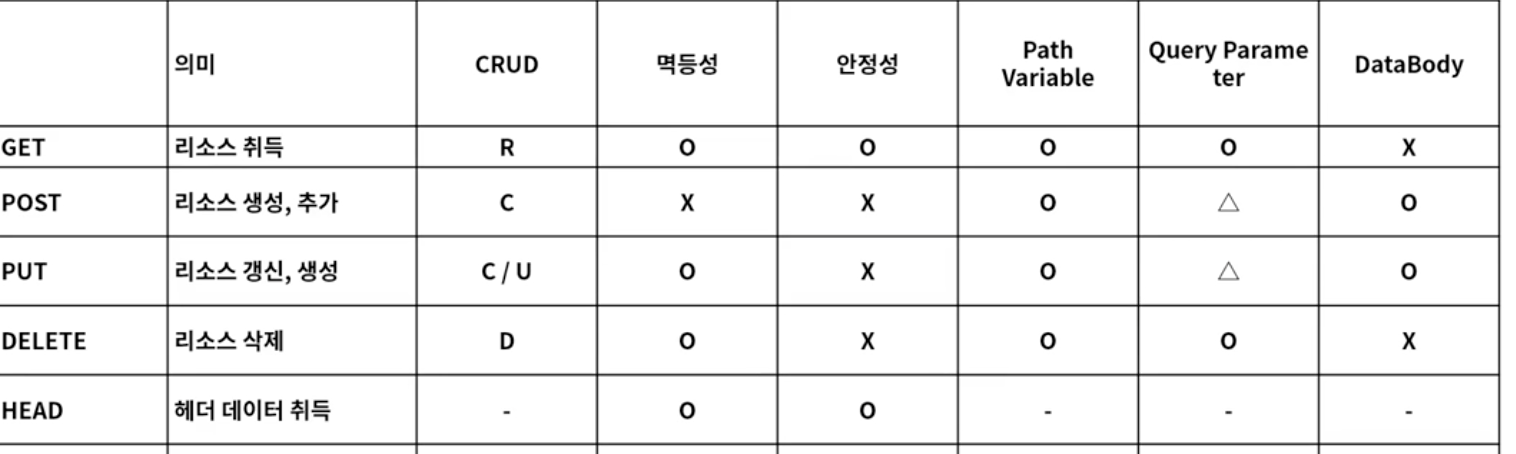
학습목표
스프링부트로 GET API의 path variable, query parameter를 처리한다.

들어가기 전에…

resource 폴더의 application.properties는 포트설정을 할 수 있다. (server.port=9090)
controller 패키지를 만들고 그 안에서 GetApiController 클래스를 만들어서 진행한다.

어노테이션 몇가지도 알고 시작하자.
@RestController : 해당 클래스는 REST API를 처리하는 컨트롤러임을 알리는 어노테이션
@RequestMapping(“/blah-blah”) : 이어져 오는 클래스나 메소드의 URI를 지정해주는 어노테이션.
@GetMapping(“/blah) : GET 요청을 매핑해주는 URI

1
2
3
4
5
6
7
8
9
10
11
12
13
14
package com.example.demo.controller;

import org.springframework.web.bind.annotation.GetMapping;
import org.springframework.web.bind.annotation.RequestMapping;
import org.springframework.web.bind.annotation.RestController;

@RestController //해당 클래스는 rest api 처리하는 컨트롤러
@RequestMapping("/api") //RequestMapping은 URI를 지정해주는 Annotation
public class ApiController {
@GetMapping("/hello") //http://localhost:9090/api/hello
public String hello(){
return "hello spring boot!";
}
}

GET API


이번 포스트에서는 GET 으로 쿼리 파라미터와 path variable을 설정해보자.

Path variable

1. path 변수 사용하기
@GetMapping 안에 path = “/hello”를 넣어 사용해도 된다.

2. RequestMapping으로 GET 처리하기
앞서 살펴본 대로 @GetMapping으로 GET 요청을 URI지정해줄 수 있다.
그런데 이 기능을 @RequestMapping으로도 가능하다.
다만, value = “/blah”, method = RequestMethod.GET을 인수로 넣어줘야 한다.

3. Path variable 처리하기
주소에 변화하는 값을 처리해야 할 때가 있다.
사람마다 다른 id를 URI에 넣어 사용할 때가 대표적인데,
이때는 Mapping 인수에 변수를 {variable}로 넣자.

그리고 이어지는 메소드의 인수에 @PathVariable(아까 정한 변수이름 = “아까 정한 변수이름”) String pathName을 넣어주자.
이때 pathName은 입력된 변수값이 된다.

코드로 확인하기

1
2
3
4
5
6
7
8
9
10
11
12
13
14
15
16
17
18
19
20
21
22
23
24
25
package com.example.demo.controller;

import org.springframework.web.bind.annotation.*;

@RestController
@RequestMapping("/api/get")
public class GetApiController {
@GetMapping(path = "/hello") //http://localhost:9090/api/get/hello
public String getHello(){
return "get Hello";
}

@RequestMapping(value = "/hi", method = RequestMethod.GET) //method 없으면, get, post, put, delete 모두 작동.
public String hi(){
return "hi";
}
//http://localhost:9090/api/get/path-variable/{name}
//{name}은 변화하는 값. 변화할 때마다 주소를 다 추가할 순 없어!

@GetMapping("/path-variable/{name}")
public String pathVariable(@PathVariable(name = "name") String pathName){
System.out.println("PathVariable: "+pathName);
return pathName;
}
}

query parameter

쿼리 파라미터?

흔히 URI를 보면 ?를 찾을 수 있다. ? 이후가 쿼리 파라미터다.
?이후 나오는 &를 기준으로 나누면, key = value 형식이 된다.

1. Map을 활용해서 쿼리 파라미터 만들기
@RequestParam 어노테이션을 활용해서 URI에서 파라미터를 가져올 수 있다.
key = value 형식을 찾아 Map에 저장하게 된다.

2. 여러 변수 받기.
메소드 인수부분에 여러 @RequestParam을 사용하면, 해당 키값과 일치하는 내용을 변수에 저장한다.
이때 변수명은 당연히 키값과 일치해야 할 것이다.

3. 객체로 인수 받기
일일히 2번 같은 방식으로 변수 만들려면 힘들다.
다른 클래스 파일을 만들어서, 우리가 사용할 변수를 private로 만들고, 그 값을 다룰 getter, setter 메소드를 만든다.
이후 컨트롤러에는 인수 자리에 그냥 객체처럼 만들면 된다.
이때 중요한 점은, @RequestParam이 필요 없다는 것이다. 이 어노테이션이 없어도 스프링부트에서 객체가 오면 자연스럽게 파라미터로 인식한다.

1
2
3
4
5
6
7
8
9
10
11
12
13
14
15
16
17
18
19
20
21
22
23
24
25
26
27
28
29
30
31
32
33
34
35
36
37
38
39
40
41
42
43
44
package com.example.demo.controller;

import com.example.demo.dto.UserRequest;
import org.springframework.web.bind.annotation.*;

import java.util.Map;

@RestController
@RequestMapping("/api/get")
public class GetApiController {
//쿼리 파라미터
//http://localhost:9090/api/get/query-param?user=steve&email=naver&age=25
@GetMapping(path = "query-param")
public String queryParam(@RequestParam Map<String, String> queryParam){
StringBuilder sb = new StringBuilder();
queryParam.entrySet().forEach(entry->{
System.out.println(entry.getKey());
System.out.println(entry.getValue());
System.out.println("\n");
sb.append(entry.getKey()+" = "+entry.getValue()+"\n");
});
return sb.toString();
}
//쿼리 파라미터 - 여러 변수 받기.
@GetMapping("query-param02")
public String queryPram02(
@RequestParam String name,
@RequestParam String email,
@RequestParam int age
){
System.out.println(name);
System.out.println(email);
System.out.println(age);
return name+" "+email+" "+age;
}
//쿼리 파라미터 - DTO
@GetMapping("query-param03")
public String queryPram03(UserRequest userRequest){
System.out.println(userRequest.getName());
System.out.println(userRequest.getEmail());
System.out.println(userRequest.getAge());
return userRequest.toString();
}
}

dto라는 패키지에 다른 클래스를 따로 만들었다.

1
2
3
4
5
6
7
8
9
10
11
12
13
14
15
16
17
18
19
20
21
22
23
24
25
26
27
28
29
30
31
32
33
34
35
36
37
38
39
40
package com.example.demo.dto;

public class UserRequest {
private String name;
private String email;
private int age;

public String getName() {
return name;
}

public void setName(String name) {
this.name = name;
}

public String getEmail() {
return email;
}

public void setEmail(String email) {
this.email = email;
}

public int getAge() {
return age;
}

public void setAge(int age) {
this.age = age;
}

@Override
public String toString() {
return "UserRequest{" +
"name='" + name + '\'' +
", email='" + email + '\'' +
", age=" + age +
'}';
}
}
Share